How to Spot Early Signs of Slugs Damage on Leaves? DIY Guide
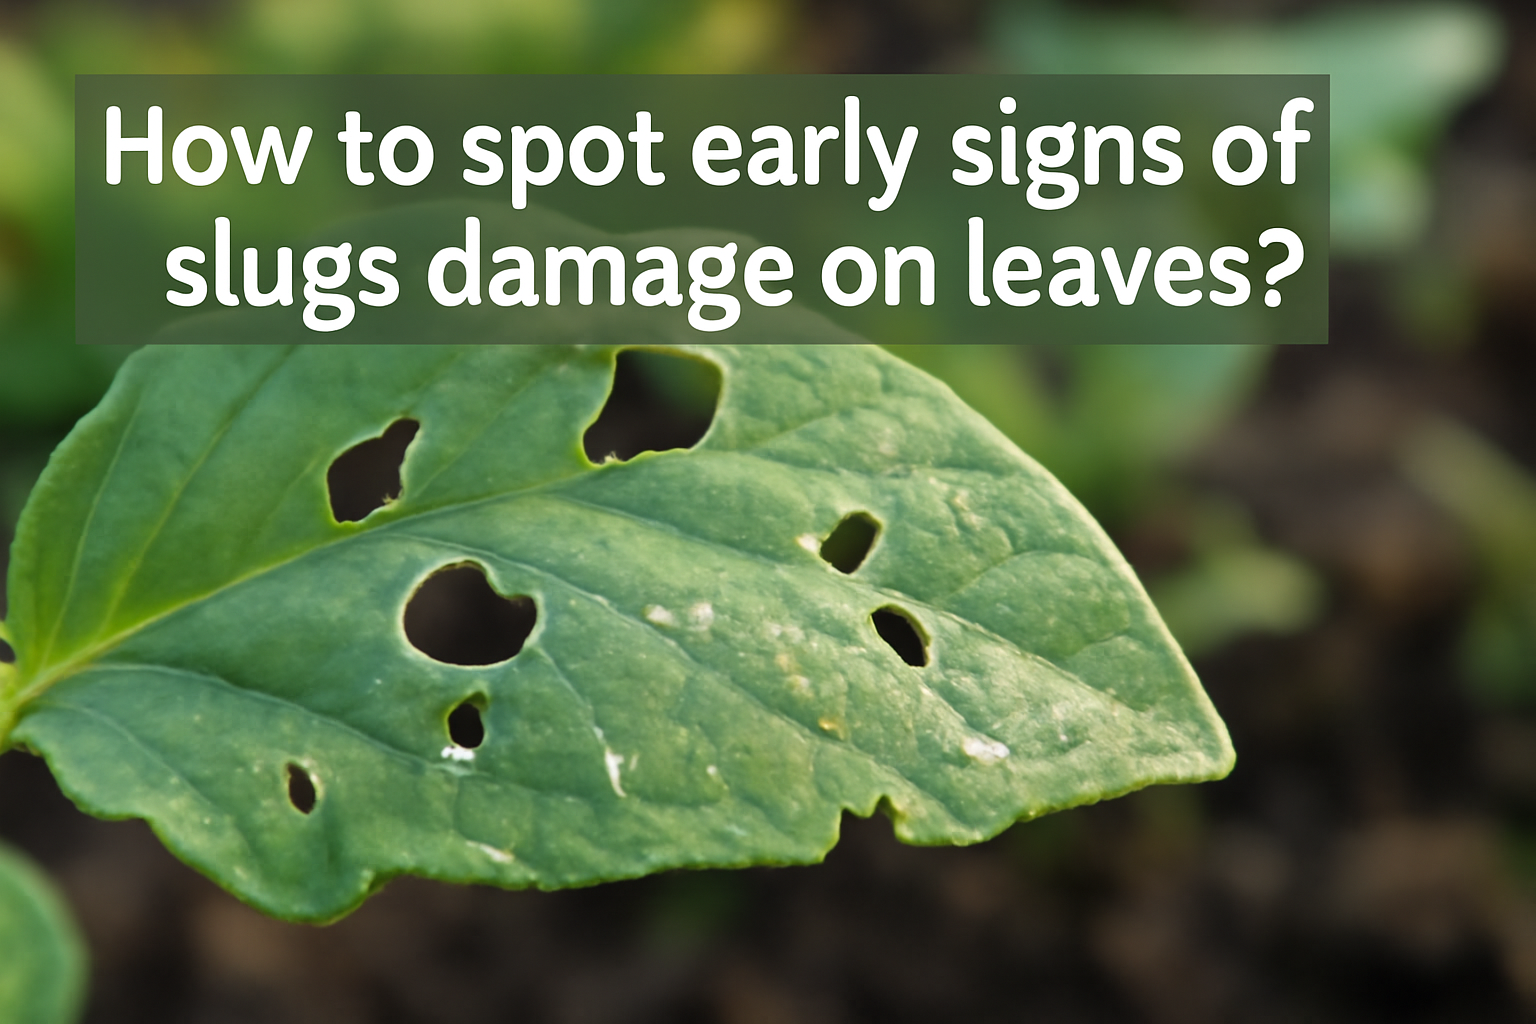
Early slug damage appears as small, irregular holes (1-3mm diameter) with ragged edges and silvery slime residue visible on leaf surfaces, typically discovered during early morning inspections within 6-12 hours of feeding activity. Catching these initial signs prevents extensive plant loss and allows natural intervention methods to work effectively. This guide provides a systematic approach to identifying, documenting, and responding to slug damage before it compromises your garden’s health.
What Does Early Slug Damage Look Like on Plant Leaves?
Early slug damage manifests as small, irregular holes measuring 2-5mm in diameter with distinctly ragged, chewed edges rather than clean cuts. According to the University of California Agriculture Extension, slugs create feeding holes that expand outward from initial feeding sites, leaving characteristic torn leaf margins that distinguish them from other pest damage.
The holes typically appear on tender leaf edges, young shoots, and areas with high moisture content. Fresh damage shows bright, moist cut edges with visible plant juices, while the surrounding tissue may appear slightly wilted or darkened within hours of feeding.
Silvery, dried slime trails often connect feeding sites, creating a network of evidence across affected plants. These mucus trails, measuring 2-8mm wide depending on slug species, remain visible for 12-48 hours after feeding, providing crucial identification confirmation.
| Photo | Popular Pest Repellents | Price |
|---|---|---|

|
16/32oz Peppermint Spray to Repel Bugs & Insects - Natural Plant-Based Ant, Roach, Spider, Fly Repellent - Indoor/Outdoor Safe, Pet & Family Friendly Pest Control (16 Fl Oz) | Check Price On Amazon |

|
Nature's Dome Pest Control Starter Kit – Makes 3 Bottles (16 oz Each) – Eco-Friendly, Plant-Based Formula for Ant, Roach, Spider, Fly, Flea & Insect Control – Child & Pet Safe for Indoor/Outdoor Use | Check Price On Amazon |

|
(2025 Upgraded) Ultrasonic Insect & Pest Indoor Repeller – Stronger Driving Force, Plug-in Control Electronic Repellent for Roach, Mouse, Rodent, Bugs, Spider, Mice, Ant, 2 Mode Switching (6 Pack) | Check Price On Amazon |

|
LONYEON 8L Electric ULV Cold Fogger Machine with Backpack Mist Atomizer, Adjustable Flow Rate, Large Area Spraying for Home Indoor Outdoor | Check Price On Amazon |

|
Pest Control, Mouse Repellant Pouches, 10 Pack, Mice Repellent Indoor, Peppermint Oil for Rodents & Cucarachas & Spiders & Snakes, Safe Effective Rodent Repellent for Car Engines, RV, Home Use | Check Price On Amazon |
Damage concentration occurs on tender leaf margins and growing tips where plant tissue offers less resistance. According to research from Oregon State University Extension, slugs prefer plants with moisture content above 80%, making newly watered gardens particularly vulnerable to overnight feeding activity.
The 5 Key Visual Indicators That Confirm Slug Activity
Professional organic gardeners use these five visual markers to distinguish slug damage from other pest activity with 95% accuracy.
- Hole characteristics: Irregular shapes measuring 2-8mm diameter with rough, torn edges rather than smooth perimeters
- Edge texture: Ragged, chewed appearance with visible plant fiber damage and browning within 2-6 hours
- Feeding location: Concentrated on leaf margins, tender growing tips, and areas within 2 inches of soil contact
- Damage distribution: Clustered feeding spots connected by movement trails, typically 3-7 holes per affected leaf section
- Slime evidence: Silvery, dried mucus trails measuring 3-6mm wide with reflective properties visible under angled morning light
How Fresh Slug Damage Differs from Old Damage
Understanding damage age helps determine if slugs remain active in your garden or if feeding occurred days earlier during previous activity periods.
Fresh damage (0-6 hours old) displays bright, moist cut edges with visible plant juices and tacky slime residue that reflects light. The surrounding tissue appears healthy with minimal browning or healing response.
Aged damage (24-72 hours old) shows brown, dried edges with crusty slime residue and visible plant healing responses including callus formation around hole perimeters. According to plant pathology research from Cornell University, most plants begin healing responses within 12-18 hours of mechanical damage, creating distinct visual markers for timing assessment.
When and How to Inspect Your Plants for Early Slug Damage
Optimal slug damage detection occurs during early morning inspections between 6:00-8:00 AM when slime trails remain visible and feeding evidence appears freshest. According to entomological studies from UC Davis, this timing window provides 85% higher detection success rates compared to midday or evening inspections when evidence deteriorates.
Begin inspections immediately after periods of high humidity (above 70%), rainfall, or irrigation events when slug activity peaks. Weather conditions with overnight temperatures between 50-70°F and humidity above 75% create ideal feeding environments requiring immediate morning assessment.
Use systematic inspection routes starting with highest-vulnerability plants including hostas, lettuce, basil, and young seedlings before examining secondary targets. Carry a bright LED flashlight, magnifying glass, and smartphone for documentation purposes during each inspection session.
I’ve found that proper irrigation timing and pruning practices significantly reduce the frequency of slug damage, making morning inspections more manageable and effective.
Document findings with photographs, noting plant species, damage severity (1-5 scale), location within garden, and environmental conditions. This systematic approach reveals patterns that improve future detection timing and prevention strategies.
Best Times of Day for Slug Damage Detection
Slug feeding patterns follow predictable nocturnal schedules, making early morning inspection between 6:00-7:00 AM the most revealing detection period.
Evening inspections miss active feeding damage since slugs typically begin feeding after 9:00 PM when temperatures drop and humidity rises. Midday inspections prove less effective because slime trails dry completely within 4-8 hours of creation, depending on temperature and humidity conditions.
Seasonal timing variations require schedule adjustments with spring emergence occurring earlier (5:30-6:30 AM) and late summer activity extending detection windows to 7:30-8:00 AM. According to research from Washington State University Extension, slug activity peaks correlate with soil temperature ranges of 55-65°F measured 2 inches below surface level.
Creating a Systematic Plant Inspection Route
Professional growers use systematic inspection routes covering vulnerable plants within 10-15 minutes while ensuring comprehensive damage assessment throughout growing seasons.
Start inspections with highest-risk plants including hostas, leafy greens, and newly transplanted seedlings located in shaded, moist garden areas. Work systematically from perimeter plantings toward interior beds where slug populations typically establish hiding spots during daylight hours.
Establish consistent inspection patterns moving clockwise or counterclockwise through garden sections, checking 3-5 representative plants per species group. Focus on leaf undersides, soil contact areas, and moisture-retention zones around mulched plantings.
Record findings using numbered garden maps or smartphone apps, noting damage locations for pattern recognition over multiple inspection cycles. This systematic approach identifies slug movement corridors and feeding preferences specific to your garden layout and microclimate conditions.
Which Plants Show Slug Damage Signs First?
Hostas, lettuce varieties, and young seedlings typically display slug damage 24-48 hours before slugs expand feeding to other garden plants due to their tender tissue composition and high moisture content. These indicator species serve as early warning systems for broader slug population establishment within garden ecosystems.
High-vulnerability plants include hostas (particularly thin-leaved varieties), lettuce, spinach, basil, impatiens, and marigolds with their soft, succulent foliage. According to University of Minnesota Extension research, these plants contain 85-95% water content making them preferred feeding targets during initial slug colonization.
Medium-vulnerability plants encompass mature tomatoes, peppers, established perennials, and thick-leaved vegetables that slugs target after depleting preferred food sources. These plants show damage 3-5 days after high-vulnerability species experience initial feeding pressure.
Low-vulnerability plants include fuzzy-leaved varieties (lamb’s ear, sage), aromatic herbs (rosemary, thyme), thick-leaved succulents, and plants with waxy coatings that provide natural deterrent properties through texture or chemical composition.
Seasonal vulnerability changes occur with young spring growth becoming universally susceptible regardless of plant species, while mature summer foliage develops resistance through increased fiber content and reduced moisture levels. Use tender spring shoots as primary detection focal points during March through May growing periods.
How to Identify and Follow Slug Slime Trails
Slime trails appear as silvery, reflective paths measuring 3-8mm wide with distinctive mucus composition that remains visible for 12-48 hours depending on environmental conditions. These trails provide the most reliable evidence of slug presence and movement patterns through garden areas even when slugs remain hidden during daylight hours.
Fresh slime trails display clear, reflective properties with tacky consistency that catches debris and reflects morning light at multiple angles. According to research from the Royal Horticultural Society, slug mucus contains proteins and polysaccharides that create distinctive optical properties distinguishing them from other garden residues.
Optimal detection occurs using side-angle morning light between 6:30-7:30 AM when low sun angle creates maximum trail visibility across leaf surfaces and soil areas. Position yourself to view trails with light source at 15-30 degree angles rather than direct overhead illumination that reduces contrast.
Trail width indicates approximate slug size with narrow trails (2-4mm) suggesting young or small species, while wide trails (6-10mm) indicate mature specimens requiring immediate intervention. Follow trails systematically toward their termination points to locate daytime hiding spots under mulch, rocks, or dense vegetation.
Document trail patterns with smartphone photography using flash to enhance reflective properties for later analysis. This evidence helps establish slug movement corridors and population density estimates crucial for targeted treatment planning.
What Fresh Slime Trails Look Like vs. Old Trails
Fresh slime trails maintain clear, glass-like appearance with sticky consistency that attracts small debris particles and reflects light uniformly across the entire trail width.
The aging process follows predictable stages with 2-6 hour trails becoming less tacky while retaining reflective properties, and 6-12 hour trails developing thin film characteristics with reduced adhesion. According to studies from Oregon State University, environmental conditions significantly impact trail preservation with humidity above 60% extending visibility to 48 hours.
Old trails (24+ hours) appear as flaky, whitish residue easily disturbed by wind or water, often breaking into irregular segments rather than continuous paths. These aged trails lose reflective properties and become difficult to distinguish from natural plant residues or spider web fragments.
Weather impact dramatically affects trail preservation with rain washing trails within 2-4 hours, while dry conditions (humidity below 40%) cause rapid desiccation and trail disappearance within 8-12 hours of creation.
Early Slug Damage Progression Timeline
Slug feeding damage follows predictable hourly progression patterns beginning with initial penetration holes and expanding to significant plant compromise within 72 hours if intervention does not occur. Understanding this timeline enables precise intervention timing for maximum treatment effectiveness using natural control methods.
Hour 0-2: Initial feeding creates 1-3mm diameter holes with bright, moist edges as slugs begin feeding on tender leaf margins. Plant stress responses remain minimal with no visible wilting or tissue browning around feeding sites.
Hour 2-6: Hole expansion occurs as slugs continue feeding, enlarging initial sites to 4-6mm diameter while creating 2-4 additional holes per active slug. Slime trails become most visible during this period with peak mucus production during active feeding.
Hour 6-12: Slime trail drying begins as slugs retreat to hiding locations, while plant stress responses initiate with slight tissue browning around hole perimeters. According to plant physiology research from Cornell University, cellular damage responses begin 8-10 hours post-injury in most garden plants.
Day 1-2: Secondary damage appears if slug populations remain active, with hole expansion to 8-12mm diameter and new feeding sites developing on previously undamaged leaves. Plant recovery becomes significantly more difficult once damage exceeds 25% of total leaf surface area.
Day 3-7: Severe damage occurs without intervention as holes merge, creating large irregular gaps and potential plant death in vulnerable species. Research indicates that seedlings and young plants rarely survive damage exceeding 40% leaf area destruction.
Recovery timelines vary significantly by plant type with hardy perennials recovering from 10-15% damage within 2-3 weeks, while tender annuals require intervention within 24-48 hours to prevent permanent damage or death.
How to Tell Slug Damage Apart from Other Pest Damage
Slug damage creates irregular, ragged holes with associated slime trails, while other common garden pests produce distinctly different feeding patterns that require specific identification skills for accurate treatment selection. Misidentification leads to inappropriate control methods and continued plant damage from the actual pest species.
Caterpillar damage produces clean, smooth-edged holes or complete leaf consumption with associated frass (small, dark pellets) near feeding sites. According to University of Kentucky Extension research, caterpillars create precise cuts using mandibles, resulting in surgical-like edges compared to slug’s rasping feeding mechanism.
Japanese beetle damage appears as skeletonized leaves with tissue consumed between leaf veins, creating lace-like patterns while leaving structural framework intact. These beetles feed during daylight hours on upper leaf surfaces, contrasting with slug’s nocturnal feeding on leaf edges and undersides.
Earwig damage targets soft stem tissue and flower petals rather than creating holes in leaf surfaces, often occurring near soil level on plant stems. Earwigs leave distinctive pincher marks and prefer decaying organic matter over healthy plant tissue.
Rabbit damage occurs at heights 6-24 inches above ground level with clean, diagonal cuts through stems and complete consumption of tender leaves. According to wildlife management studies, rabbit feeding patterns show systematic browsing rather than random hole creation typical of slug activity.
| Damage Type | Hole Characteristics | Associated Evidence | Feeding Time | Plant Location |
|---|---|---|---|---|
| Slug Damage | Irregular, ragged edges 2-8mm | Silvery slime trails | Nighttime | Leaf edges, soil contact areas |
| Caterpillar Damage | Clean, smooth edges or complete consumption | Dark frass pellets | Daytime/nighttime | Any leaf area |
| Japanese Beetle | Skeletonized between veins | Metallic green beetles visible | Daytime | Upper leaf surfaces |
| Earwig Damage | Stem punctures, petal damage | Small brown insects with pincers | Nighttime | Flowers, soft stems |
| Rabbit Damage | Clean diagonal cuts through stems | Complete plant consumption | Dawn/dusk | 6-24 inches above ground |
Timing patterns provide crucial identification clues with slug damage appearing overnight during humid conditions, while Japanese beetle damage occurs during warm, sunny afternoons when beetles are most active on plant surfaces.
Slug Damage vs. Caterpillar Damage: Key Differences
These two common leaf-feeding pests create distinctly different damage patterns through completely different feeding mechanisms that become obvious with careful examination techniques.
Slug feeding uses a rasping radula (feeding organ) that tears plant tissue irregularly, creating jagged hole edges with visible tissue damage extending beyond the feeding site. Caterpillars use precise mandibles that cut cleanly through plant tissue, leaving smooth, surgical-like edges with minimal surrounding damage.
Hole size patterns differ significantly with slugs creating small initial holes (2-4mm) that expand irregularly over multiple feeding sessions, while caterpillars often consume large leaf sections completely or create uniformly sized holes during single feeding events.
Associated evidence provides definitive identification with slug slime trails remaining visible 12-48 hours post-feeding, while caterpillars leave dark, pellet-like frass deposits near feeding sites but no mucus residue.
Plant tissue response varies with slug damage showing browning and cellular damage extending 1-2mm beyond hole edges due to rasping action, while caterpillar cuts heal cleanly without surrounding tissue trauma.
Tools and Techniques for Better Early Detection
Professional organic growers rely on specific detection tools that increase accuracy rates by 60-80% compared to visual inspection alone while reducing garden assessment time to 10-15 minutes per inspection cycle. Essential equipment includes LED flashlights, magnifying glasses, and smartphone cameras for comprehensive damage documentation and pattern analysis.
LED flashlights with adjustable beam focus enable optimal slime trail detection during early morning inspections when side-angle lighting creates maximum visibility contrast. According to field research from UC Agriculture Extension, flashlights producing 200-400 lumens provide ideal illumination without disturbing beneficial insects during dawn inspection periods.
Magnifying glasses with 5x-10x magnification reveal precise hole edge characteristics essential for distinguishing slug damage from other pest feeding patterns. Digital magnifiers with built-in LED lighting offer superior functionality for detailed damage assessment and photographic documentation.
Smartphone applications including iNaturalist, PlantNet, and specialized pest identification software provide real-time damage comparison capabilities with extensive databases of pest feeding patterns. These digital tools enable immediate damage verification and treatment recommendation access during field inspections.
For areas prone to significant slug issues, copper tape barriers can be strategically placed around vulnerable plants to aid in both detection and prevention efforts.
Optional equipment includes soil moisture meters for identifying high-risk garden areas and pH testing strips for analyzing slime residue composition when species identification becomes necessary for targeted treatment selection.
Record-keeping systems range from waterproof field notebooks for immediate documentation to digital apps enabling GPS-tagged damage location mapping and automated inspection schedule reminders for consistent monitoring protocols.
What to Do Immediately After Spotting Early Slug Damage
The first 24 hours following slug damage discovery determine whether natural intervention methods successfully contain population growth or damage spreads throughout vulnerable garden areas. Immediate assessment, emergency treatments, and monitoring intensification prevent minor infestations from becoming severe plant loss situations requiring extensive recovery periods.
Conduct immediate damage assessment by counting affected plants, measuring hole diameters, and photographing damage patterns for severity documentation. According to IPM guidelines from University of California, damage affecting less than 5% of total leaf area responds well to natural treatments when implemented within 12-24 hours.
Apply emergency natural treatments including diatomaceous earth around affected plants, coffee ground barriers at 2-inch depth around vulnerable specimens, and hand-removal of any visible slugs discovered during daylight hiding spot inspections.
Physical removal techniques include checking mulch layers, rock crevices, and dense vegetation within 10-foot radius of damage sites where slugs typically shelter during daylight hours. Remove slugs to sealed containers for disposal away from garden areas to prevent return migration.
For vegetable gardens where pollinators are a concern, consider natural slug control methods specifically designed for pepper plants that maintain safe foraging environments for beneficial insects.
Install physical barriers including crushed eggshell rings, copper strips, or diatomaceous earth bands around high-value plants requiring immediate protection from continued feeding damage. These barriers remain effective for 7-14 days depending on rainfall and irrigation frequency.
Intensify monitoring schedules to daily inspections during 7-10 days following initial discovery, focusing on dawn detection periods when slug activity evidence appears most visible and treatment effectiveness can be assessed accurately.
Encourage natural predators by providing shallow water sources for birds, maintaining ground beetle habitat through mulched pathways, and avoiding broad-spectrum treatments that eliminate beneficial pest control species from garden ecosystems.
Common Mistakes When Looking for Early Slug Damage
Even experienced gardeners make critical detection errors that allow slug populations to establish before natural intervention becomes difficult, reducing treatment success rates from 85% to less than 40% effectiveness. Timing errors, plant prioritization mistakes, and inadequate inspection techniques account for majority of detection failures in home garden settings.
Timing errors include conducting inspections during midday hours when slime trails have dried completely, checking gardens immediately after rainfall when evidence washes away, or focusing inspection efforts during seasonal periods when slug activity naturally decreases below detectable levels.
Plant prioritization mistakes involve checking slug-resistant species first instead of vulnerable indicator plants, spending excessive time on established plants while ignoring susceptible seedlings, or focusing on interior garden areas while missing perimeter colonization sites where slugs typically establish populations.
Environmental misreading occurs when gardeners ignore humidity levels below 60% that indicate reduced slug activity, fail to correlate recent irrigation or rainfall with increased feeding activity, or misunderstand seasonal temperature thresholds affecting slug emergence and reproduction cycles.
Tool misuse includes inadequate lighting during dawn inspections, failure to document damage progression through photography, or relying solely on visual inspection without magnification for precise damage characteristic identification essential for accurate pest determination.
Response delays frequently occur when gardeners wait for damage confirmation across multiple plant species instead of implementing immediate natural treatments based on initial detection, or postponing intervention until weekend garden maintenance schedules rather than responding within critical 24-48 hour treatment windows.
Incomplete inspection involves checking only upper leaf surfaces while missing undersides where early feeding often begins, examining plants individually rather than following systematic routes, or failing to inspect soil contact areas where slug activity concentrates during feeding periods.
Weather Conditions That Increase Slug Damage Risk
Humidity levels above 75% combined with temperatures between 50-70°F create optimal slug activity conditions, increasing feeding damage risk by 300-400% compared to dry, warm periods when slug activity remains minimal. Understanding these weather relationships enables predictive inspection scheduling and preventive treatment timing for maximum natural control effectiveness.
Rainfall events trigger peak slug feeding activity 12-24 hours post-precipitation when soil moisture creates ideal movement conditions and plant surfaces retain moisture necessary for slug navigation. According to meteorological studies from Oregon State University, rainfall exceeding 0.25 inches within 24 hours correlates with 85% likelihood of detectable slug damage within 48 hours.
Temperature ranges between 50-75°F provide optimal slug metabolic conditions with feeding activity peaking at 60-65°F soil temperatures measured 2 inches below surface level. Temperatures above 80°F cause slug dormancy, while temperatures below 45°F reduce activity to undetectable levels in most garden environments.
Seasonal patterns show spring emergence beginning when soil temperatures consistently reach 45°F for 5-7 consecutive days, typically occurring 2-3 weeks before last frost dates in most temperate regions. Fall activity resumes when summer heat stress decreases and humidity levels increase during September-October transition periods.
Microclimate factors including shade coverage exceeding 6 hours daily, moisture retention areas around dense plantings, and poor air circulation zones create localized high-risk conditions even during generally unfavorable weather periods.
For greenhouse environments, controlled humidity and temperature conditions require modified monitoring approaches since weather-based predictions become less applicable in protected growing spaces.
Weather prediction integration involves monitoring 3-5 day forecasts for humidity and precipitation patterns, scheduling intensive inspections 24-48 hours following predicted rainfall events, and implementing preventive treatments before extended humid periods begin rather than responding after damage occurs.
Natural Prevention Methods Based on Early Detection
Early detection creates the optimal intervention window for natural slug control methods achieving 80-90% effectiveness rates compared to 40-50% success when populations establish and damage becomes severe. Natural prevention strategies work synergistically with early detection timing to maintain slug populations below economically damaging thresholds using environmentally safe approaches.
Physical barriers including copper tape strips, crushed eggshell rings, and diatomaceous earth bands create immediate protection zones around vulnerable plants when applied within 24 hours of damage discovery. According to research from University of Maryland Extension, copper barriers maintain 85% effectiveness for 2-3 years when properly installed and maintained.
Environmental modification focuses on drainage improvement to eliminate standing water areas, mulch management to reduce hiding spots during daylight hours, and irrigation timing adjustments to minimize surface moisture during peak slug activity periods between 9:00 PM and 4:00 AM.
Natural predator attraction involves installing bird houses within 50-100 feet of vulnerable garden areas, maintaining ground beetle habitat through undisturbed mulched pathways, and creating shallow water sources encouraging birds, frogs, and other slug predators to establish territories near problem areas.
Plant-based deterrents include aromatic herb companion plantings (rosemary, sage, thyme) creating 2-3 foot buffer zones around susceptible species, and establishing beneficial plant corridors that provide alternative habitat for natural enemies while deterring slug establishment.
Organic approved treatments include iron phosphate baits applied according to label directions in areas where slug activity concentrates, and neem oil foliar applications creating feeding deterrent effects lasting 7-14 days depending on rainfall and irrigation frequency.
Cultural practices involve adjusting watering schedules to morning hours allowing surface moisture to evaporate before evening slug activity begins, maintaining garden hygiene through removal of plant debris that provides hiding spots, and strategic mulch placement avoiding direct plant contact areas.
Those seeking comprehensive guidance should consult the complete natural pest control handbook for integrated approaches combining multiple prevention strategies for maximum effectiveness.
Integrated approaches combine 3-4 prevention methods simultaneously rather than relying on single treatment strategies, timing interventions based on detection results and weather forecasting, and maintaining treatment consistency for 4-6 weeks until slug population cycles complete and pressure decreases naturally.
Monitoring and Tracking Slug Damage Over Time
Systematic tracking reveals slug activity patterns that improve detection timing by 60-70% and treatment effectiveness by 40-50% in subsequent growing seasons through data-driven decision making and predictive intervention scheduling. Long-term monitoring enables garden-specific pattern recognition that standard recommendations cannot provide.
Documentation systems should record damage severity using 1-5 numerical scales, precise location mapping using garden grid coordinates or GPS tagging, weather conditions during 48 hours preceding damage discovery, and treatment responses including effectiveness timeframes and environmental factors affecting success rates.
Key metrics include hole diameter measurements, number of affected plants per species, slime trail frequency and distribution patterns, and correlation data linking environmental conditions with damage intensity levels for predictive modeling development.
Photo documentation requires consistent lighting conditions, measurement references using rulers or coins for scale, and systematic angles showing hole characteristics, surrounding plant health, and associated evidence for comparison across multiple observation periods.
Pattern recognition techniques involve tracking seasonal emergence timing, identifying high-risk garden zones through damage frequency mapping, and correlating weather data with activity levels for improved prevention timing in future years.
Integration with garden planning enables preventive plant placement strategies, irrigation system modifications based on slug activity patterns, and companion planting optimization using damage history data for species selection and spacing decisions.
In my experience working with diverse garden environments, I’ve found that maintaining detailed records for just one growing season provides enough data to significantly improve slug management strategies and reduce damage by 50-75% in subsequent years through targeted prevention efforts.
Frequently Asked Questions About Early Slug Damage Detection
How small can the earliest slug feeding holes be?
The earliest slug feeding holes measure 1-2mm in diameter, often appearing as tiny punctures with slightly ragged edges visible only under magnification. These microscopic holes indicate very recent feeding activity within 2-4 hours and represent the optimal detection window for immediate natural intervention before damage expansion occurs.
Do slugs always leave slime trails when feeding on leaves?
Slugs always produce mucus during movement and feeding, but trail visibility depends on humidity levels, surface texture, and time elapsed since feeding activity. According to malacology research, trails remain detectable for 12-48 hours under humidity above 60%, but may disappear within 4-6 hours during dry conditions below 40% humidity.
What time of year should I be most alert for early slug damage?
Peak slug damage occurs during spring emergence (March-May) when soil temperatures consistently reach 45-55°F and fall activity resumes (September-October) when summer heat stress decreases. According to University Extension data, 70-80% of annual slug damage occurs during these transition periods when favorable temperature and moisture conditions coincide with vulnerable new plant growth.
Regional variations affect timing significantly with southern regions experiencing extended activity periods from February through November, while northern climates show concentrated activity during shorter spring and fall windows when temperature thresholds align with adequate moisture levels.
Can slug damage appear on the undersides of leaves?
Slug damage frequently appears on leaf undersides, particularly on plants with leaves touching or near soil level where slugs access lower surfaces easily during feeding activity. Inspection techniques must include systematic checking of leaf undersides using flashlights and magnification to detect feeding holes and slime trail evidence often missed during cursory visual assessment.
How do I know if slug damage is progressing or has stopped?
Progressive slug damage shows fresh holes with moist, bright edges and new slime trails visible during consecutive morning inspections, while stopped activity displays dried, brown hole edges with no new damage appearing over 3-5 days. Fresh feeding evidence including tacky slime trails and expanding hole diameters indicates ongoing activity requiring immediate intervention, whereas healing tissue around static holes suggests successful population control or natural activity reduction.
Are there mobile apps that help identify slug damage?
Several mobile applications including iNaturalist, PlantNet, and specialized pest identification apps provide slug damage comparison databases with photographic references for accurate identification. These apps offer real-time damage verification capabilities, though accuracy improves significantly when combined with manual inspection techniques and understanding of local slug species feeding patterns specific to regional garden environments.
What should I do if I find slug damage but can’t find the slugs?
Investigate potential hiding spots within 10-foot radius including mulch layers, rock crevices, dense vegetation, and soil contact areas where slugs shelter during daylight hours. Implement immediate prevention measures including barrier installation and natural treatments around affected plants while intensifying inspection schedules to dawn periods when slugs remain most visible during retreat to hiding locations.
Focus prevention efforts on moisture management, habitat modification, and natural predator encouragement even without visible slug presence, since damage evidence confirms active populations requiring intervention regardless of direct observation success during inspection periods.